Mikhail Naganov
Improving audio in Mercedes GLK350 (X204), Part 1
We have owned our old trusty Merz GLK350 for a while. It was manufactured in 2012—the initial edition of X204, before the “facelift”. It’s a somewhat practical car in terms of its size and capacity, one obvious downside being relatively high gas consumption even in “economy” mode.

Anyways, this post is not about the car itself but rather about its audio system. Our car was stocked with the basic audio system called “Audio 20”. It wasn’t sounding very well. I could hear a lot of distortion and initially I was blaming the amplifier for this. However, when I’ve got a chance to look at the door speaker while overseeing a replacement of a broken passenger glass (a case of vandalism in Palo Alto, CA), I realized that this paper cone with a bit of magnetized steel can’t sound good in principle.
Input
At that time we were living in an apartment in Palo Alto so there was no good place to work on the car. The only thing I could do was to modernize the input. My model of “Audio 20” (this name is used by Mercedes for the family of the head units, not for a particular generation) offers the following external inputs: Bluetooth SBC, iPod (the old multi-pin version), USB thumb drive, and Line In (Aux). The first 3 options are obviously outdated, but Line In could be utilized for connecting a modern audio source.
Conveniently, both the USB receptacle and the Line In socket are located in the gloves compartment and can be utilized for connecting a USB bus-powered Bluetooth receiver that supports AAC and aptX HD for streaming audio from a phone. There is no shortage of portable Bluetooth receivers today, the only culprit was to find one that doesn’t require turning it on manually. I’ve found a BluDento BLT-HD “desktop” receiver that I liked for its minimalist design, absence of any buttons and a good analog output. This device turns itself on as soon as power is provided over USB. That means, it gets activated every time I turn on Audio 20, and then the phone automatically connects to BLT-HD, creating a “seamless” experience.
The only issue with BLT-HD is that its line output is a bit too powerful (2.1 Vrms) for the Line In input of Audio 20, so if you turn up Bluetooth volume on the phone too high, the input starts clipping. However, staying at lower BT volume levels works OK.
Replacing Front Door Speakers
Soon after moving to Southern California and now renting a house instead of apartment, I started researching possible speaker replacements. I quickly found that Mercedes was offering 3 kinds of audio system for X204 and its brother W204 (C-Class): the basic one that I have, a slightly better one, and a “premium” Harman-Kardon Logic 7 with 9 cabin speakers and a subwoofer mounted inside the spare wheel. Obviously, the premium system has to have good speakers as no amount of DSP correction could make a bad speaker sound good. Fortunately those different kinds of speakers all use the same housing and connectors so it’s entirely possible to swap the bad ones for those from the HKL7 configuration.
After researching on MBWorld and on YouTube, I realized that only speakers in the front door can be replaced with a relative ease. Rear door speakers are attached from inside the door, so instead of removing them properly people usually just cut the paper cone out and stick some other speaker on top of the old housing. I didn’t like this idea so I decided to focus on the front door speakers only, and later I’ve found a way to minimize the impact of the rear door speakers.
The front door speaker system consists of a woofer in the lower part of the door and a tweeter in the mirror triangle. The part number for the HKL7 woofer is A2048202102, and for the tweeter it’s A2128201002. I’ve bought a pair of tweeters on eBay from some disassembled car—the speakers are quite sturdy so it’s very hard to damage them. Woofers offered on eBay weren’t looking promising—most of them had visible dents, so I decided to buy them as new replacement parts from an MB dealer instead.
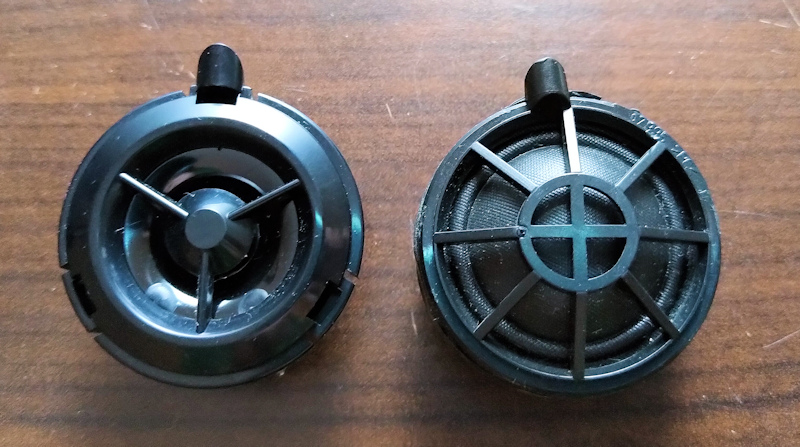
BTW, just by comparing how these drivers were built it’s easy to predict which of them sound good and which sound bad. The tweeter from the “basic” audio is a kind of a compression driver with a waveguide and a protective harness on top (on the left). From looking at this harness it’s easy to see that it will produce reflections right away, resulting in a comb effect. In contrast, a HKL7 tweeter (on the right) is a hard dome with a protective grid.
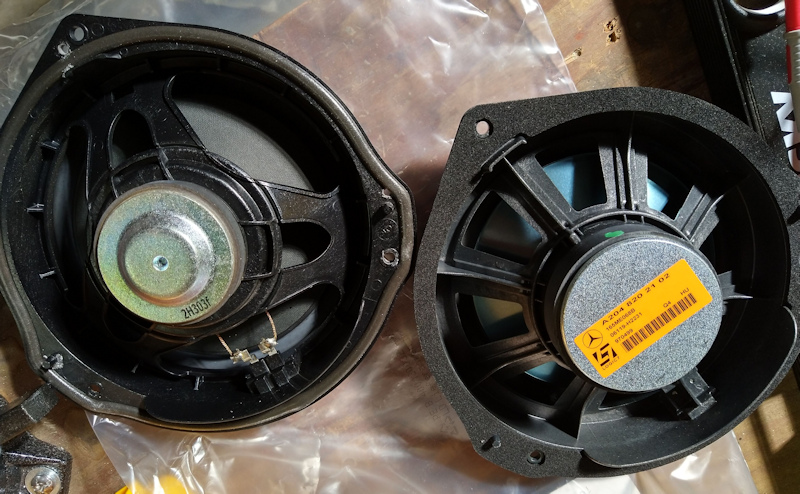
Woofers for HKL7 also look more promising (see on the photo below on the right, on the left is the “basic” speaker)—aluminium cone on a suspension, but still quite lightweight compared to aluminium cone drivers used for regular speakers.
Replacing the front door tweeter in X204 is a no brainer—no tools are needed, just pop out the mirror triangle, disconnect the old tweeter and put the new one on its place—as I’ve mentioned, all the housing and connectors are the same. Replacing the woofer is more involved and requires taking off the door cover and dealing with rivets. But in the end it had turned out to be relatively easy, too. The only part that drove me mad was the retainer clip for the door panel (part A0009917940)—it’s over-engineered for sure and probably requires some special tool for easy removal. Instead, I bought a spare pair of those clips from the dealer so I could break the old ones and proceed further.

While commencing the replacement I discovered another horrifying (from audio engineering perspective) thing—there is no crossover between the tweeter and the woofer in the “basic” audio configuration. The wire from the head unit is simply split at the door connector. I suppose, in the HKL7 configuration each speaker is driven separately in order to be able to time align the drivers. But just omitting a passive crossover in the “basic” configuration—that’s so cheap. Shame on you, Mercedes!
Passive Crossover
I must say, the system with decent front door speakers already sounded noticeably better than the “basic” one. However, I was always returning to thoughts about the crossover and decided to do something about it. Since Mercedes doesn’t bother to provide them, I had to look somewhere else.
The problem with passive crossovers is that the driver is part of the schematics, providing necessary load and inductive impedance, thus if we use a passive crossover designed for some other drivers it will not work as designed. It doesn’t necessarily mean it won’t work at all, just that the crossover point and attenuation will be different.
The other problem is that this crossover needs to be designed for use in an automobile, otherwise it could fall apart from vibration. I’ve found a company called AudioFrog which manufactures drives and passive crossovers for “hi-fi” auto installations. After looking at the specs of their drivers and comparing them to HKL7 drivers I decided to try AudioFrog’s GSC610C passive crossover.

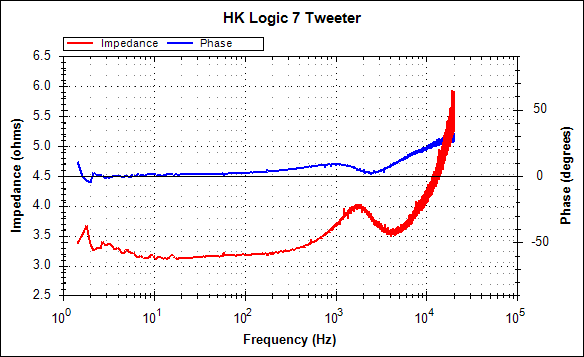
While researching this topic, I’ve made a couple of measurements of the HKL7 drivers. Here is the tweeter (measured with QuantAsylum QA401 + QA460):
Here is the woofer:
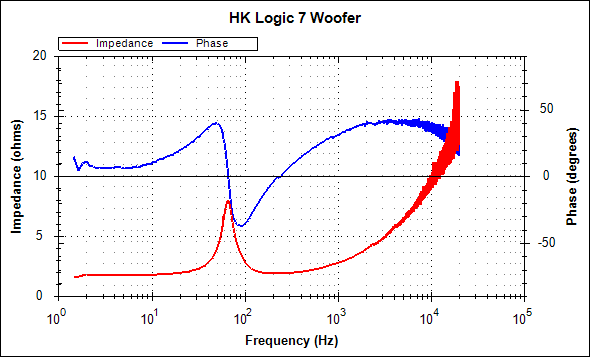
As we can see, the woofer has a nominal impedance closer to 2 Ohm, whereas the speakers GSC610C was designed for (GS10 and GS60) have nominal 4 Ohm impedance.
In order to investigate how GSC610C will work with HKL7 speakers I’ve built a model of a door speaker:

Yes, I used my experience from building LXmini and stocked all the parts at the plumbing department. Although the model looks funny, it allowed me to experiment with the speakers and the crossover in my room, without causing any harm to the car.
Here are the graphs of the electrical output from the GSC610C crossover when it’s connected to HKL7 speakers:
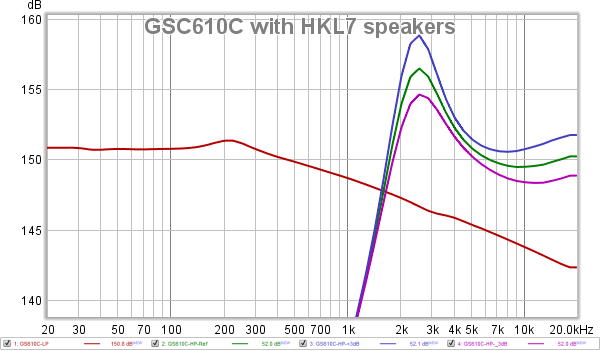
GSC610C offers 3 settings for the high-pass filter, they can be seen on the right part of the graph. The slope of the low-pass filter is very gentle—about 1.2 dB per octave. As a result, there is only -3 dB of woofer output attenuation at the point where it crosses with the high-pass filter. However, don’t forget that the woofer is located at the far end of the door, near the driver’s feet so there is also acoustic attenuation.
Here is how acoustic output from the drivers is affected by the crossover. The measurements were taken using a microphone very close to each driver, using my model of the door speaker:

Note that the sharp roll-off at low frequencies and the hump at 230 Hz is an artifact of my model. When installed into the door, the woofer goes down to 40 Hz smoothly. The direct output from drivers are the top lines. As we can see, the output of the woofer goes up to 7 kHz (obviously, in break-up mode as this is a 6 inch driver) and has a resonance around 4 kHz (see the arrow). Thanks to the low-pass filter, the resonance gets attenuated. For the tweeter, application of the crossover allows to achieve a smoother roll-off. Overall, use of the crossover reduces interference between the drivers.
After making these preliminary measurements I decided to go ahead and install the crossover into the car. Installation and tuning will be covered in the second part of this post.