Mikhail Naganov
Audio Output on Teensy 4.x Boards
I remember learning about Teensy for the first time several years ago from a colleague. He was using Google WALT device for measuring audio latency, and WALT is based on Teensy-LC board. Back then, this board had impressed me with its tiny size, albeit providing a lot of features. Its processing power is very modest though—Teensy-LC is based ARM Cortex-M0+ processor running at 48 MHz.
Recently I’ve started a project of a talking ABC board for my daughter and decided to check what progress had Teensy made. I was very impressed learning that the latest (4th) version of Teensy emplys a much beefier ARM Cortex-M7 processor running at 600 MHz! This board is more powerful than the desktop computer I was using 25 years ago, and that’s at a fraction of the cost of that PC, and on the footprint of a USB memory stick.
Note that Teensy is a microcontroller board which means it doesn’t have an operating system. This is what makes Teensy different from Raspberry Pi, for example. This fact has a lot of advantages: first, Teensy boots instantly, second, all the processing power of its CPU is available to your own app. This also means that the board can’t be used for general PC tasks like checking Facebook. However, Teensy can be used for more exciting things like building your own interactive toy.
In my case I needed Teensy to play an audio clip (pronounciation of a letter) in response to pressing of a button. Sounds easy, right? However, one thing I needed to do is to figure out how to play audio on Teensy. What I’ve learned is that Teensy 4.x offers a lot of ways to do that. In this post I’m comparing various ways of making sound on Teensy.
Teensy 4.0 vs 4.1
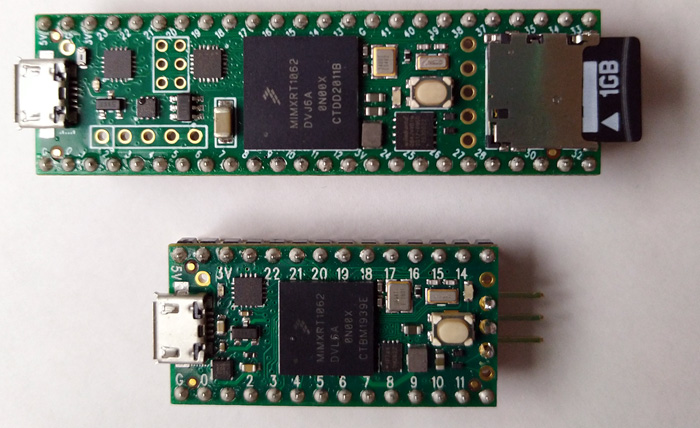
Every Teensy generation comes in two flavors: small and slightly bigger. Below is the photo of Teensy 4.1 (top) and 4.0 (bottom):
Both boards use the same processor which means their basic capabilities are the same. However, bigger size means more I/O pins available. Also, it’s possible to add more memory to Teensy 4.1 by soldering additional chips on its back side. For my project, the important difference is that Teensy 4.1 has an SD card slot, whereas 4.0 only provides pins for it. I plan to use the SD card for storing sound samples–the board’s flash memory is unfortunately too small for them. Storing samples on an SD card also simplifies their deployment as I can simply write them down from a PC.
The audio capabilities of 4.0 and 4.1 are thus the same, so I will be referring to the board simply as “Teensy 4” or “4.x”.
Teensy Audio Library
From the programming side Teensy is compatible with the Arduino family of microcontrollers. The same Arduino IDE is used for compiling the code, and the same I/O and processing libraries can be employed.
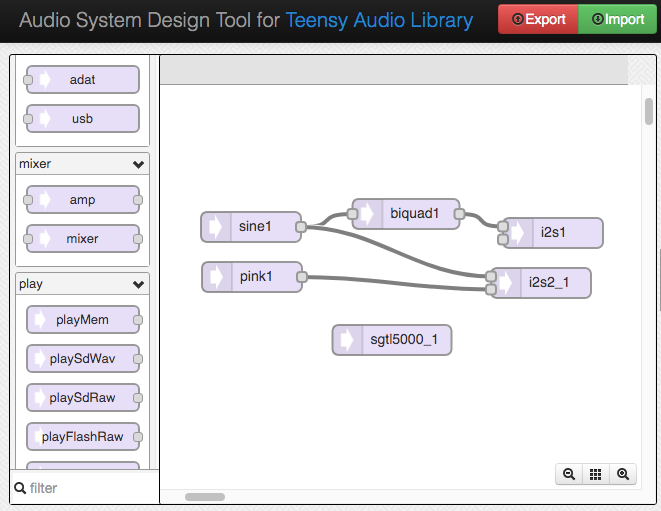
Teensy also has a dedicated Audio library which in my opinion is very interesting. The library has a companion System Design Tool which allows to design an audio processing chain really quick by drag’n’drop, and then export it to the Arduino project.
Being a visual tool, Audio System Designer allows to explore the capabilities of the library without a need to go through a lot of documentation to get started. The documentation is built into tool. The only drawback of the docs is that they are too short. Although, this is partially compensated by numerous example programs.
The described audio capabilities are all based on the objects provided by Teensy Audio Library.
Output Power Requirements
My plan is to use an 8 Ohm 0.5 W speaker from Sparkfun for audio output in my project. Thus, I’m comparing output from audio amplifiers using an 8 Ohm resistive load and ensuring 2 VRMS output voltage (approx. 6 dBV). The goal is to achieve as “clean” output as possible.
Built-in Analog Output (MQS)
The chip that Teensy 4 is based on offers analog output solution which is called MQS for “Medium Quality Sound”. Not to be confused with Mastering Quality Sound which has the same abbreviation. MQS on Teensy 4 is a proprietary technology of the chip maker (NXP). MQS allows connecting a small speaker or headphones to the chip pins directly, without any external output network.
Note the revision 3 of Teensy board has a built-in 12-bit DAC. MQS implements a 16-bit DAC with small Class-D amplifier. However, not very good ones. To me, “medium” in MQS is a stretch, coined by the marketing department, and perhaps it would be more fair to call it “LQS” for “Low Quality Sound”.
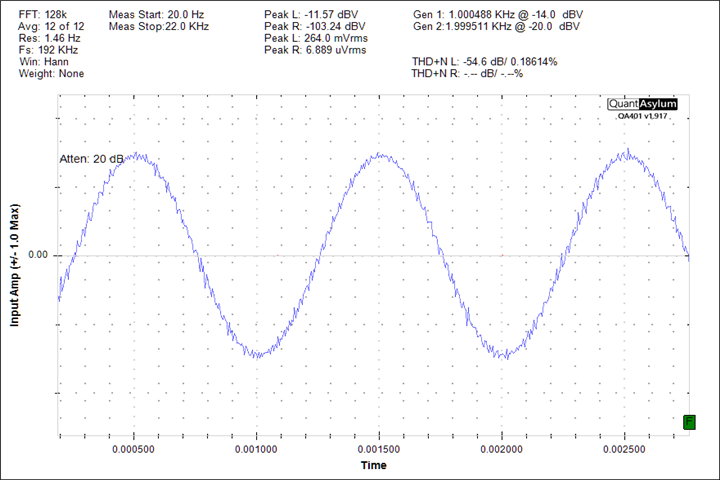
Let’s first take a look at a simple 1 kHz sine wave in time domain:
It definitely looks very jaggy to me. Another problem detected by using a DVM is a high DC bias offset: 1.64 VDC. It doesn’t show up on the graph because the audio analyzer is AC-coupled. This amount of DC offset can pose a problem to line inputs and even to some speakers.
Another drawback of MQS is that the chip doesn’t provide muting for the power-on thump. This can be worked around by adding a relay, after all it’s trivial to control it using a PWM output pin, however if you have to use external parts, I would recommend using an external DAC instead.
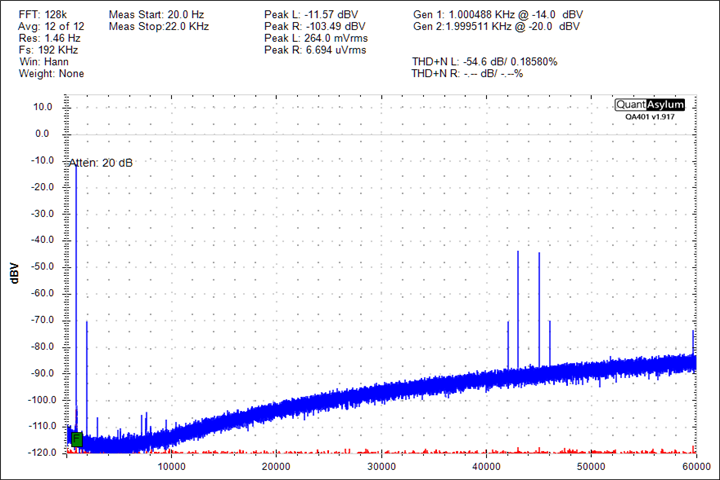
Below are a couple more measurement graph revealing shocking simplicity of this output. First, as we can see on the frequency domain graph, there is no antialiasing filter, so we can see the mirror image of the original 1 kHz frequency and its first harmonic between 42–44 kHz followed by a direct copy. That means, the DAC/amp on the chip likely uses 44.1 kHz sampling rate.
Frequency response in the audible range is rather flat:
When I tried to achieve the required 0.5 W into 8 Ohm I could only squeeze out 1/100 of that (note that the graph is A-weighted):
In my opinion, due to absence of any filtering, turn on click protection, high DC bias, and low power, MQS output should only be used during development and testing—it’s indeed convenient that a speaker can be attached directly to the board for a quick sound check.
External Output Devices via I2S
Since built-in analog output has serious limitations, I’ve started looking for external boards. Thankfully, Teensy supports I2S input and output. Teensy actually supports plenty of those interfaces, offering great possibilities for multi-channel audio I/O.
For my project mono output is enough. I tried a couple of inexpensive external boards to check how much the audio output improves compared to the built-in output.
MAX98357A DAC/Amp
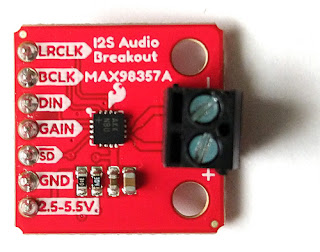
I bought a breakout board from Sparkfun to try this IC. The datasheet calls the chip “PCM Class D Amplifier with Class AB Performance.” Note that it’s a mono amplifier which either sums its stereo input, or just uses only one of the two input channels.
Hooking it up to Teensy is extremely easy. One needs to connect the
clocks: LRCLK and BCLK to the corresponding pins on Teensy, then
connect I2S data (OUT1x, I used OUT1A), and of course
power, which can be also sourced from Teensy. Then just use i2s or
i2s2 output block in the Audio Designer. There is no volume control
on this breakout board, only the amplifier gain can be changed.
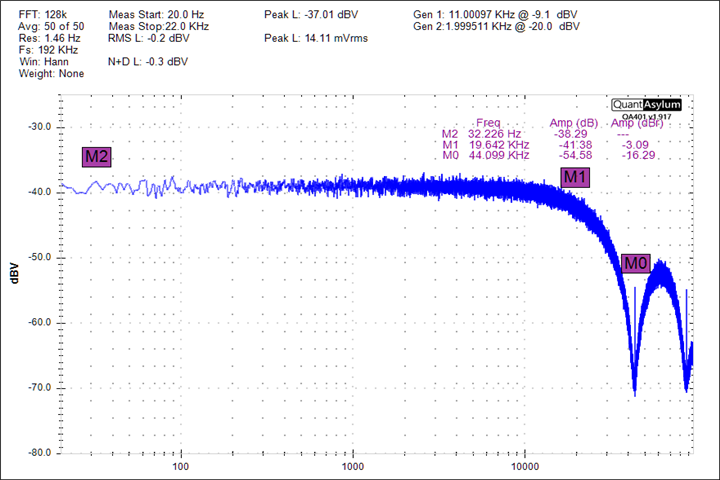
MAX98357A IC can accept a variety of sampling rates and bit depts, however Teensy normally produces 44.1/16 audio signal. Looking at the white noise output we can see that the MAX IC employs a proper brickwall audio band filter at the DAC side:
The frequency response in the audible range is rather flat:
Another good feature of the IC compared to MQS is proper output muting on power on to prevent pops. The speaker output has almost no DC offset.
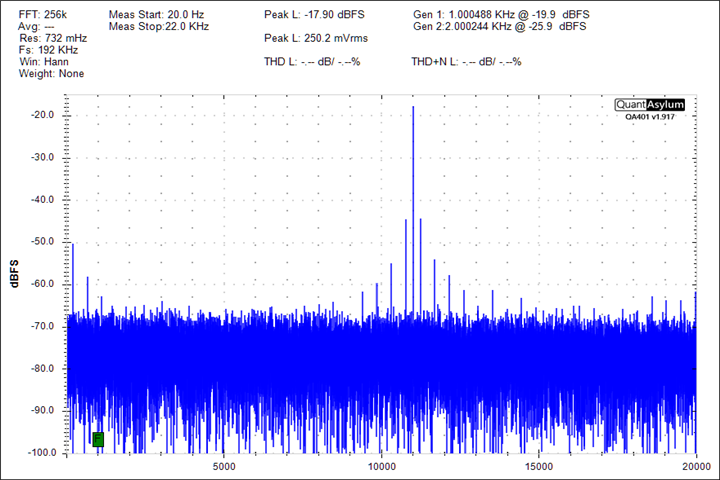
As for the jitter, the IC seems to employ clever synchronization tricks. Initially after powering on the jitter is gross and the noise floors is very high:
However, after 5–15 sec the IC seems to stabilize its input and drastically improve its output quality:
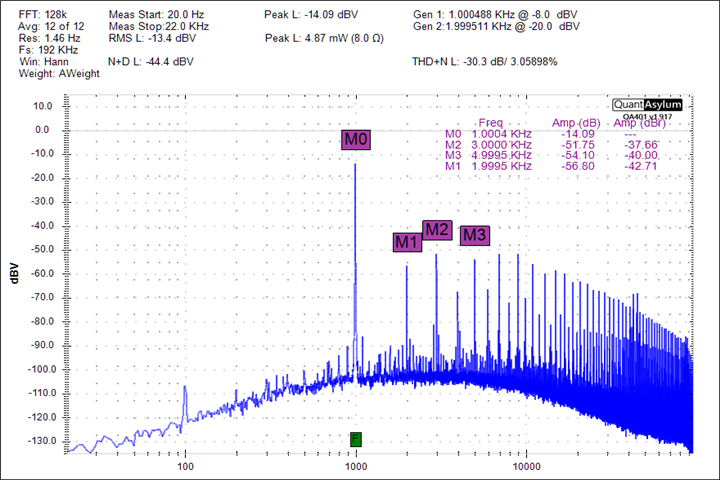
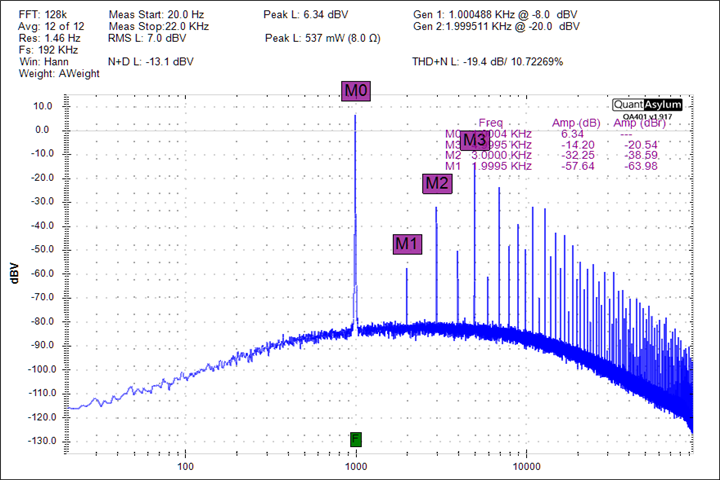
The MAX98357A was able to deliver the required 0.5 W albeit with a 10% distortion (this graph was obtained with the amplifier configured for 12 dB gain):
It’s interesting that the 5th harmonic is dominating.
Considering the price of the chip, I would say that MAX98357A IC is a good choice if only mono output is needed and has a lot of advantages over the MQS output.
Audio Adapter Board
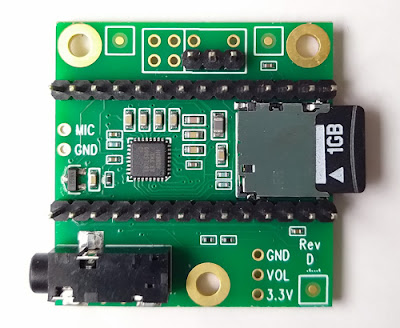
Since the times of Teensy 3 its creators were offering an “audio shield” board which is designed to cover the smaller version of Teensy completely. Due to some changes in pin assignments on Teensy 4 the design of the Audio Adapter Board was updated.
The audio part of the Adapter board is based on the SGTL5000 chip which in addition to ADC/DAC and amplifiers also offers some basic DSP functionality.
The Adapter board has line input and output, mic input, and headphone output. It uses I2S interface for communicating with Teensy. The board also offers an SD card slot and a controller for it. Note that although Teensy 4 has an on-chip SD card controller, there is no SD card slot on the 4.0 board. Adding it requires soldering a cable to the corresponding pins on the back side of the board, because the pin spacing and overall space is a bit tight for soldering an SD card socket directly. Thus, for a Teensy-based audio project it might be beneficial to attach the audio shield as it provides both analog audio I/O and an SD card.
One thing many users of this board noted is that is must be connected
to Teensy using very short wires. The reason is due to use of an
additional (compared to MAX98357A) high-frequency master clock input
(MCLK) which runs at the frequency of several MHz.
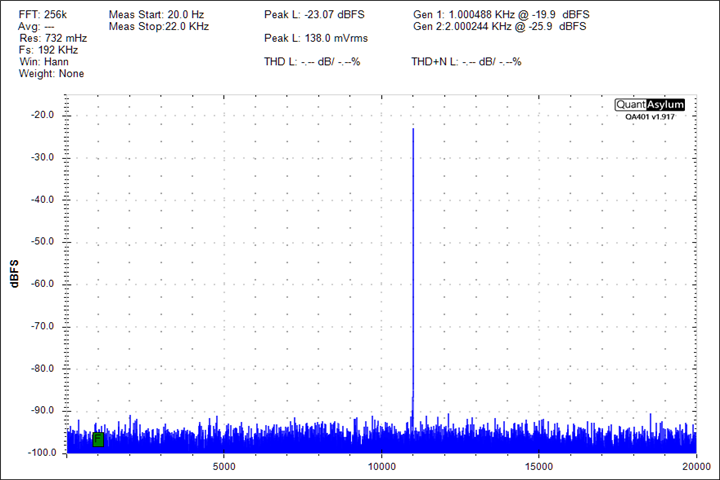
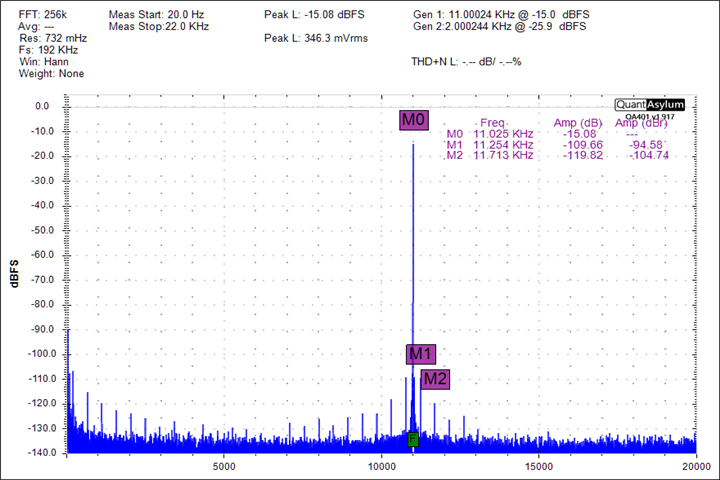
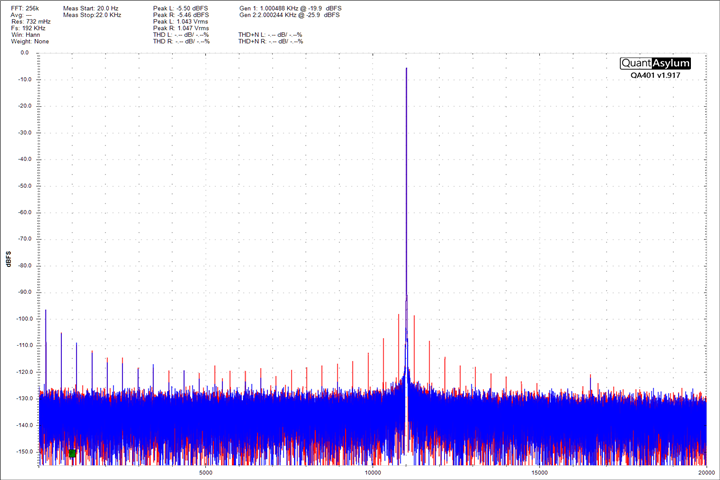
The resulting jitter of the DAC is quite low, staying below 94 dB the carrier signal:
Surely, the SGTL5000 chip is advanced enough to have protection against the power-on thump. The level of distortions is tolerable (since it’s a line output, I had connected it directly to the analyzer’s input):
Note a noise peak at 60 Hz. I’m pretty sure it’s the result of insufficient shielding on this board because the measurement was taken using differential input of the analyzer. This normally cancels out any EMF noise induced on the probe wires.
The headphone output of the adapter board isn’t powerful enough to drive the load required for my project. So in addition to the adapter board an external power amplifier has to be used.
External Analog Amplifiers
I’ve tested two boards from Sparkfun: a mono Class-D amp, and a classic Class-AB amplifier named “Noisy Cricket”. These amplifiers can be connected to the line output of the audio adapter board.
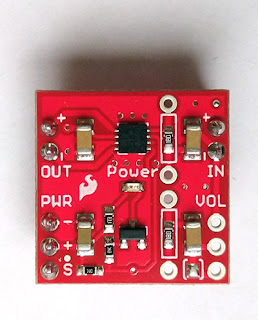
Mono Class-D Amp (TPA2005D1)
This is a low power IC amplifier for which Sparkfun has a breakout board. This is a rather old chip TPA2005D1 from Texas Instruments which advertises a 10% THD on its specs sheet.
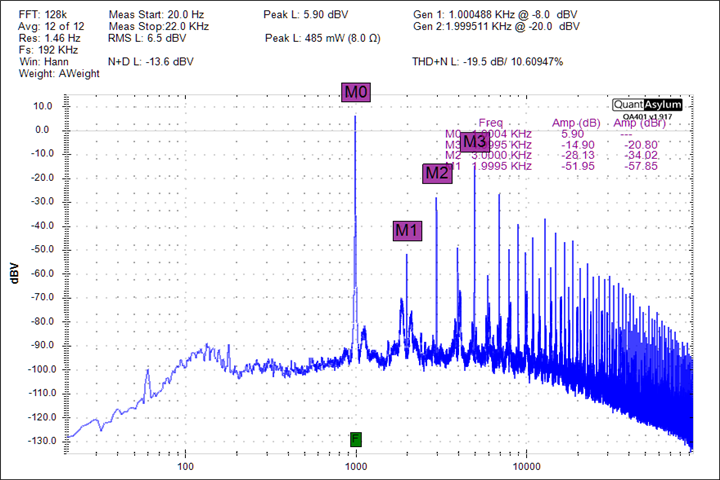
And indeed it does have a 10% THD+N when driven up to the required output power (the graph is A-weighted):
Note that I tested this chip on its own, providing an input from the audio analyzer, and powering it using a bench power supply. Despite being tested under these “laboratory” conditions, the chip didn’t show a stellar performance. I also tried supplying a differential input from the analyzer, and raising the input voltage up to the accepted maximum of 5.5 VDC but it didn’t improve its performance.
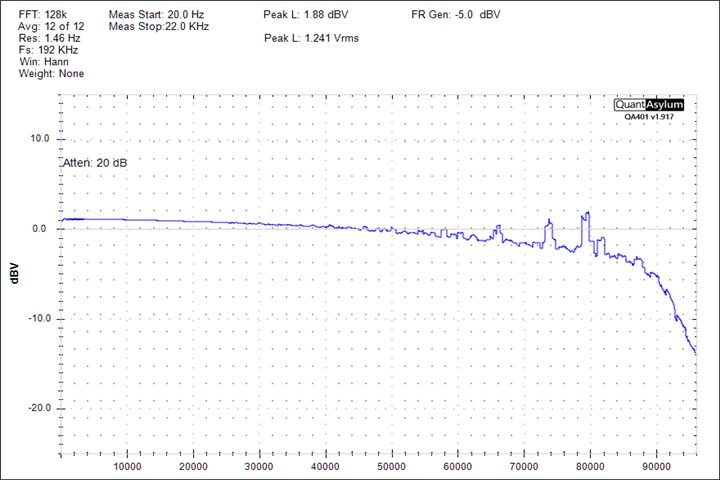
It’s interesting though, that being an unfiltered Class-D amplifier with 250 kHz switching frequency, this chip offers bandwidth which is enough to serve the full range of the QA401 DAC at 192 kHz sampling rate:
So it seems that there shouldn’t be a big difference in terms of audio quality when using the MAX98357A chip via I2S directly, or TPA2005D1 via the line output of the audio shield.
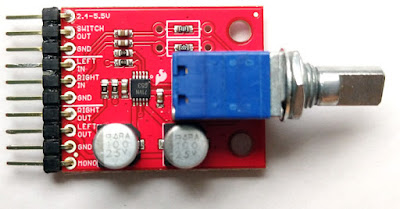
Noisy Cricket (LM4853)
This is another IC amplifier from TI on a good quality breakout board by Sparkfun, which even includes a volume control. The IC is LM4853 amplifier chip (not just an op-amp). It can work either as a stereo amplifier, or as a mono amplifier in bridged mode.
The specs sheet of LM4853 shows much better distortion figures than for TPA2005D1. I had configured the board in mono mode and tested it in the same setup as TPA2005D1: powered from a bench power supply (at 3.4 VDC) and driven by QA401 signal generator. The results were much better:
The 3rd harmonic is 50 dB below the carrier level. For my toy project this is good enough.
Looking at the frequency response, we see some roll-off in the bass range, but I’m pretty sure that the speaker I’m going to use can’t go that low anyway, so it’s not a big deal:
So, Noisy Cricket is a good choice for me. Hopefully I will be able to achieve close to natural voice reproduction on my talking ABC.
Conclusions
Despite that boards based on Class-D chips are more compact and likely consume less power, when using a speaker of a classic cone construction it seems better to use a classic Class-AB DAC/Amp combination built from the Audio Adapter board and Noisy Cricket.
I’m putting a big rechargeable battery into this talking ABC, so higher power consumption isn’t a problem for me. Additional convenience of using the audio shield comes from the fact that it has mounting holes and an SD card for storing audio samples.
If a more sensitive speaker could be used which requires less driving power, then an alternative solution is to use Teensy 4.1 which already has the SD card slot on board, and connect the MAX98357A DAC/Amp chip to Teensy’s I2S output.
Bonus: Built-in Digital Output—S/PDIF
I have moved this section to the end because this output finds no application in my project. However, it’s a new feature of Teensy 4 which also might be useful sometimes.
On the previous generations of the board, thanks to the efforts of the Audio Library contributors, it was possible to emit signal in the S/PDIF and ADAT formats programmatically. The nicety of the hardware support added in Teensy 4 is that it consumes less power and allows yielding the CPU to more interesting tasks.
The hardware S/PDIF output is as simple to use as MQS—it only requires connecting an RCA output to the board pins. This output only supports Audio CD output format: 44.1 kHz, 16-bit. I must note that although the built-in S/PDIF worked for me on the Teensy 4.0, on its bigger version 4.1 the S/PDIF sampling rate for some reason was setting itself to 48 kHz which made it unusable since Teensy Audio Library doesn’t seem to support it. Thus, I could only test the built-in S/PDIF on Teensy 4.0.
Apparently, with a digital input there are no concerns about filtering or non-linearity in analog domain. One thing I was curious to check was the amount of jitter. I hooked up Teensy 4 to the S/PDIF input of RME Fireface UCX interface and then used the same J-Test 44/16 test signal generated using REW 5.20. RME was set to use the S/PDIF clock. I played the same J-Test signal on Teensy and via USB ASIO to be able to compare them. Here is what I’ve got—the blue graph is from USB, the red one is from Teensy:
As we can see, the output of Teensy has much more stronger jitter-induced components around the carrier frequency, whereas there are practically none for RME’s own output.
Note that the peaks on the left side (up to 6.5 kHz) is some artefact of using 16-bit test signal on a 24-bit device (RME). I tried another DAC (Cambridge Audio DacMagic Plus), another computer, switched from PC to Mac, tried 16-bit J-Test sample from HydrogenAudio forum, but these spikes on the left were always there as long as I was using 16-bit J-Test signal, and they were completely gone on 24-bit test signal. I suspect there must be something in the process of expansion of a 16-bit signal to 24-bit that makes them appear.
