Mikhail Naganov
LXmini Desktop Version (LXdesktop)—Part I: Build
I would like to make a couple of posts regarding my project which was going on for a long time—a couple of years, actually—and finally got to a satisfying conclusion. As I wrote earlier (see this post and this post) I did build LXmini speakers in their original version, and then was experimenting a bit with different crossover settings and tunings. Then after a house move, I could not use them as floor speakers anymore, and decided to make a more radical experiment and turn them into a desktop near field version. In this post I will talk about the build differences versus the original design by S. Linkwitz, and in subsequent post (or posts?) I will explain the tuning process.
Major Differences
Let’s start with the two most important changes.
Height Reduction
The first obvious difference is of course the reduced height of the speakers, since they have to stand on the desktop now. I always work standing, and this puts my head a bit higher above the surface of the desktop compared to a seated position. This is actually good because the vertical stand of LXmini also doubles as the enclosure for the woofer, and thus it shouldn’t be too small in order to provide enough spring back action for the woofer driver. I think there is no need to remind everyone that LXmini are designed around simple plumbing pipes. When choosing the height for the vertical stand pipe, I was aiming to get the space between the bottom of the full-range driver and the woofer at my eye level:
The idea behind this requirement is that ears are about at the eye level, and in order to preserve the distances from both drivers to the ear as the head moves closer to or further from the speaker, the ear and both drivers must form an isosceles triangle:
Preserving the distances helps to maintain the time delay between the drivers and the ear, which is important for preserving acoustical summing of sound waves from the drivers.
The length of my vertical stand pipes ended up to be 43 cm (17 inches). Obviously, the change of the working volume for the woofer driver changes its frequency response, so I could not use the original equalizer settings. However, this wasn’t a problem for me since I knew that I will end up using my own tuning anyway.
The Speaker Connector
Another major change was in the speaker connector. I’m a big fan of SpeakON connectors by Neutrik. Since LXmini uses line-level crossovers and an amplifier per driver, its speaker cable has 4 wires. SpeakONs exist in various versions including the 4-pole—the model NL4FC. SpeakONs are much more convenient and also safer than traditional speaker posts for “banana” plugs which the original LXmini design uses. The height of those posts and plugs allowed putting them at the bottom of the speaker, however SpeakON connectors are significantly longer and would not fit under the speaker. Thus, I had to move connector to the back side of the speaker. This also makes the connection process a lot easier.
The receptacle for the SpeakON at the rear side also serves as a lock holding the vertical pipe and its stand together. Because of that, only one complementing bolt is required on the front side.
Minor Tweaks
Besides these major changes, I also had a couple of ideas how to make the assembly process more convenient.
Threaded Bolt Holes
The first idea was to use 1/4-20 button cap Allen head bolts everywhere possible, and eliminate the need for nuts by threading the holes in pipes instead. This change makes the process of assembling the top part of the speaker much easier. For example, one step of the assembly procedure requires centering the full-range driver at the end of the horizontal pipe by means of 3 of 4 screws. The original design uses nuts screwed to the bottom of bolts—just enough to make a flat surface:
Aligning these bolts around the driver’s magnet is a cumbersome procedure due to the strong interaction between them. In my design, the threaded boltholes prevent movement of the bolts, and screwing them in while preserving alignment becomes much easier:
Another fiddly step of the assembly procedure is alignment of the horizontal pipe to make the surface of the full-range driver to be at the right angle to the surface of the woofer. The horizontal pipe rests on 3 screws that have to be adjusted. The heads of two of them are easily accessible:
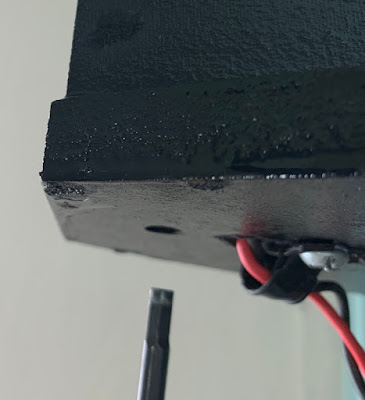
The third one in the original design must be a long one, and I did not have such a long bolt, so instead I used a short one and was adjusting it via a hole at the bottom of the woofer’s plate:
Pipe Clamps
I have removed the top pipe clamp since it is purely decorative, and it can vibrate at high frequencies, creating undesired resonance. The bottom pipe clamp is functional since it holds the rubber collar on top of the vertical pipe. In order to prevent its possible vibration, first I have put a piece of rubber between the loose end of the clamp steel stripe and the rest of it. Then I used a wire in order to secure the loose end as much as possible:
Alignment Post (Not the best idea :)
Finally, this is the change which did not work as expected. I usually use laser guides while setting up speakers. Since surfaces that we are surrounded with in our homes are never ideal, the only true guides for setting up things straight are gravity and lasers. With regular rectangular boxes of convenient speakers, putting a laser level on top of them is a trivial task, but with the round pipes of the LXmini design it’s not. So, my idea was to add a threaded post on top of the speaker in order to mount a laser level on it.
The idea did not work out because although the laser level holds well on the post, it’s practically impossible to set it up aligned properly with the speaker itself. So, I had to abandon this idea and instead put marks at the baseplate of the speaker, and this is where I put the laser level during the set-up.
Overall Look
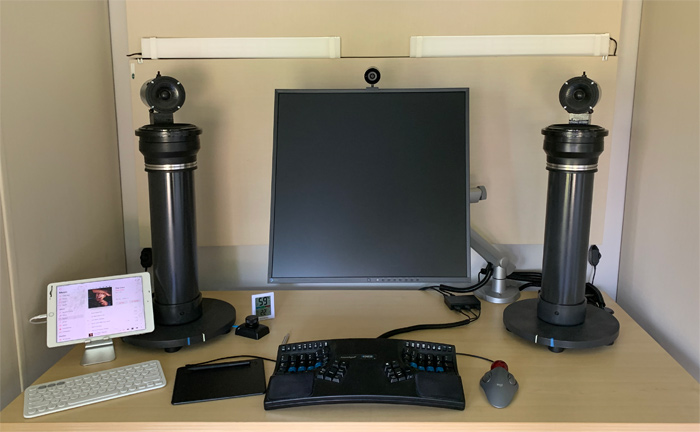
This is how the desktop setup looked like initially (yes, the monitor has exact square aspect ratio :):
Note that it is recommended to put dipoles at least 1 meter from the real wall, however in the desktop setup this is not possible. Instead, I have acoustic absorbers mounted around the desk.
After living with this classical 60 degrees stereo setup for a while, I decided to try to improve imaging by using the directional property of dipoles in order to suppress the sound going into the opposite (ipsilateral) ear. The speakers got moved closer to my side of the desk, and were rotated away from me:
Below is a schematic diagram, a view from above:
The process of configuring the speakers for this setup will be explained in the next post, stay tuned!


