Mikhail Naganov
Understanding Git, Part 2
Publishing the next part of my talk about Git. See the first part here.
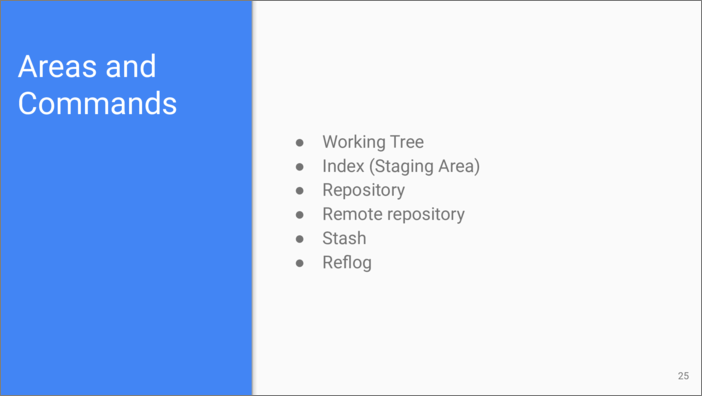
Let’s continue to the second part of the talk. Whereas the building blocks we were considering in the first part are more or less abstract and can be used for understanding generic principles of any distributed version control system, the areas and especially commands are specific to Git.
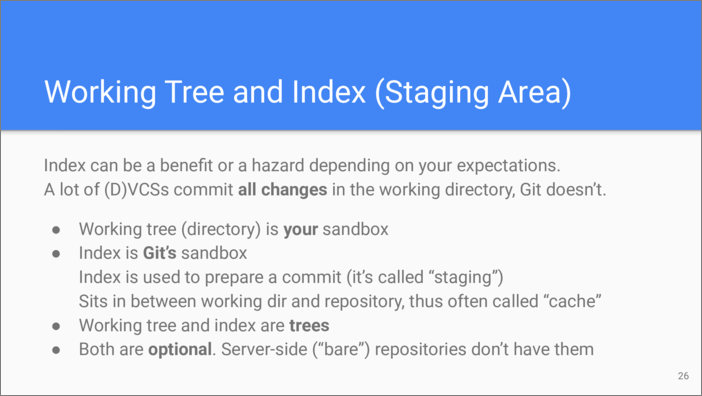
Let’s start with Working tree and Index. The Working tree is something that is understood by all Git users—it’s their sandbox where they do all your edits and file structure manipulations. It can be also referred to as “Working Directory”.
As for the Index, it’s a more confusing area and depending on your experience with other version control systems, index can be either a benefit or a hazard (rephrasing Rick Dekkard). Some version control systems do not have index, thus changes in the working tree are immediately committed into the repository. Not so with Git. Here, Index is an intermediate area where the next commit is staged. That’s why Index is also referred to as “Staging Area”. In order to commit a change to the file, it must be first registered with Index.
Because Index sits between the working tree and the repository, it is also referred to as “Cache”. No wonder why reading Git’s messages and help pages related to Index can be very confusing! Speaking of the building blocks we were considering earlier, both Working tree and Index can be represented as Tree objects. Also note that both Working tree and Index are optional and are only needed to prepare new commits. On a headless Git server they do not exist as there are no users who would commit changes to the server repository directly.
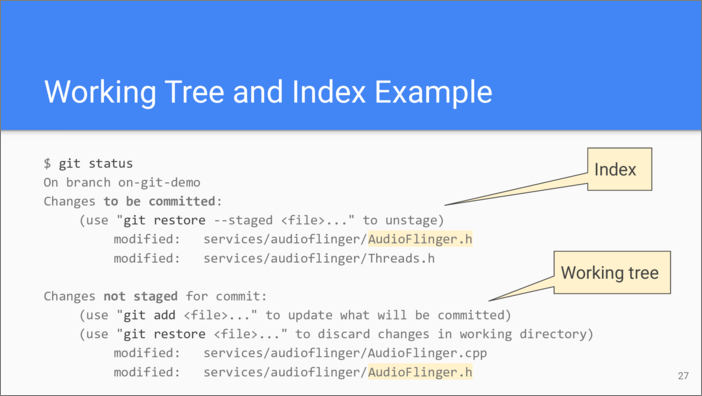
As an example, let’s consider typical output from the git
status command. The above output
appears when there are changes both to the index and to the working
tree. The changes that have already been registered with Index are
listed first. Changes that haven’t yet been registered are listed at the
bottom.
Note that the same file can be listed in both sections meaning that some of the changes in it are in the Index and some are not. That illustrates the “benefit or a hazard” behavior. On one hand, index allows you to split the changes your are making to the working tree into several commits. But this also can produce an unfinished commit that misses some changes you’ve done in the working tree but forgot to stage.
In this output Git hints us about some commands that can be used in order to move files between the index and the working directory. Let’s explore them.
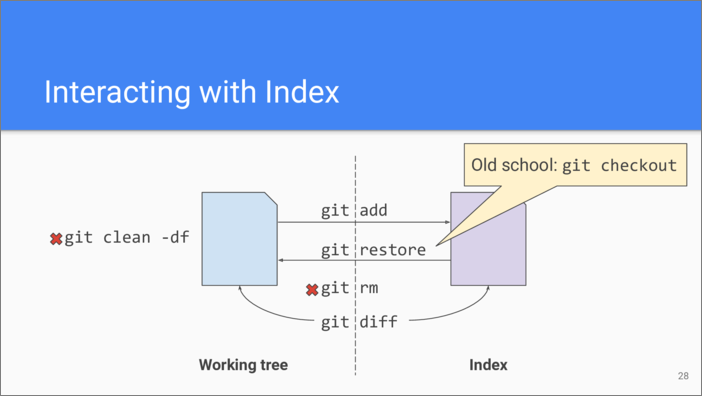
git add is used to stage to the
index any changes in the file. It’s also used to put a file under
version control. If you want to undo the changes done to the file in the
working tree and use previously staged version, use git
restore command. This is a
relatively new command and long time git users know that a more
universal git checkout
command can also be used for the same purpose.
If we want to remove the file from under version control, we use git
rm command which erases it in the
working tree and also removes from the index. If there are any untracked
garbage files or directories in the working tree, they can be easily
removed using git clean
command.
If we want to see the changes done to the files in the working tree
compared to the staging area, we need to use git
diff command which generates a
diff object.
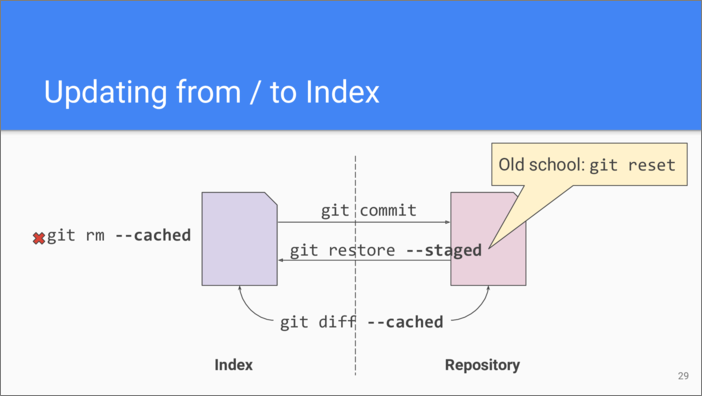
Moving onto the next level, let’s consider how do we move changes
between the index and the repository. The git
commit command is well known—it
creates a commit object that points to the tree object of the index and
adds both to the repository.
In order to see the changes before we commit them we can use git
diff with --cached argument—it shows the difference between the
index tree and the tree from the last commit.
Previously mentioned git rm and git restore commands can be used
to remove or undo changes in the index. Note that there is an
inconsistency between the argument names they use.
And of course, there is no direct way to remove a committed change from the repository.
An interesting question: what does it contain in a “clean” state, e.g.
after doing git checkout or git
reset? A good answer to this
question is in the “Reset demystified” section of “Pro Git”
book.
On checkout, the tree of the index is the same as the tree from the
checked out commit (and same as your working dir assuming you haven’t
made any changes to it yet). Thus, both git diff and git diff
--cached produce an empty diff immediately after a checkout. If we
make a change in the working directory to an already tracked file, git
diff shows it. Once we stage this change (git add), it is now
shown by git diff --cached, but isn’t shown by git diff.
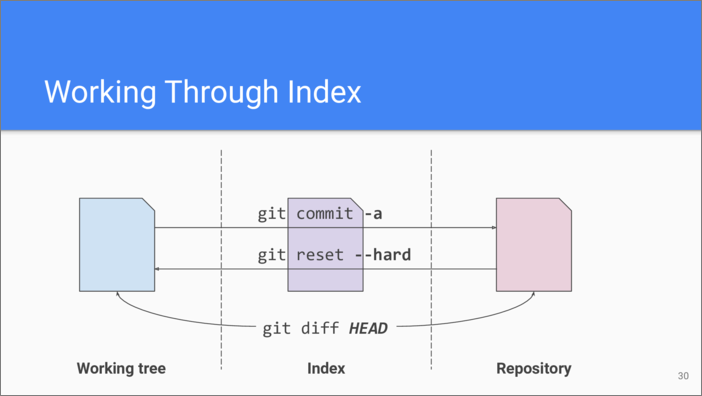
Finally, for those users who don’t want to fiddle with the cache, there
is a way to work through it, as if it didn’t exist. Using -a
argument with git commit command automatically puts all the current
changes from the working tree into the index before creating a commit.
git reset with --hard argument can be used to replace the
contents of the working tree and the index from the last commit in the
repository directly. And git diff HEAD (all caps) can be used to
show combined differences between the working tree plus index and the
last commit. git diff HEAD puts the tree of the working dir on top
of the tree of Index and diffs the result against the tree of the last
commit (so if there are both staged and unstaged changes to the same
line the latter will be shown).
What is HEAD, exactly? It’s a special reference in the repository that we consider next.
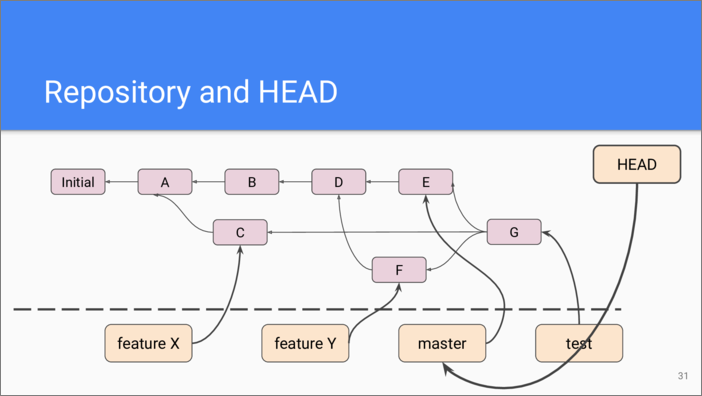
This is the already familiar diagram of the commit graph with branches. HEAD usually points to what is called “current” branch—the line of changes we are working on. Note that HEAD is a meta-reference—instead of pointing to a commit via its hash it instead contains the branch name, thus when we use HEAD, double dereferencing is needed to get to the commit.
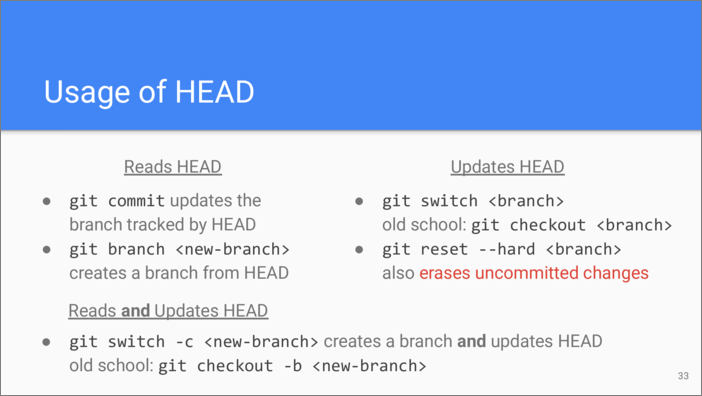
This is how HEAD can be used and changed. When we do a commit, git
commit uses HEAD to get to the last commit on the current branch and
make it the parent of the freshly created commit. Then git commit
updates that branch to point to the new commit.
git branch command can be
used for creating a new branch without switching to it. A relatively new
command for changing the current branch, and thus updating HEAD is
git switch. Note that git
switch will refuse to work if there are any uncommitted changes in the
working tree, because switching to a branch also means populating the
working tree contents using the last commit of the branch, and any
uncommitted changes will be lost. In case we actually want to lose them,
we can use git reset --hard and provide it with the branch name.
git switch with -c argument is used for creating a new branch
and switching to it (that is, updating HEAD).
People often ask, what are the differences between relatively new git
restore and git switch commands vs. good old git checkout and
git reset. There is an excellent write-up on GitHub
blog about
this. In short, git restore and git switch are safer
alternatives to old commands, but they don’t replace them fully. There
are some similarities in their arguments, e.g. for interactive
piece-by-piece restoration both git reset and git restore use
-p argument, but there are differences too, e.g. git switch -c
is the same as git checkout -b. In general, the arguments of the new
commands should be more straightforward and easier to understand.
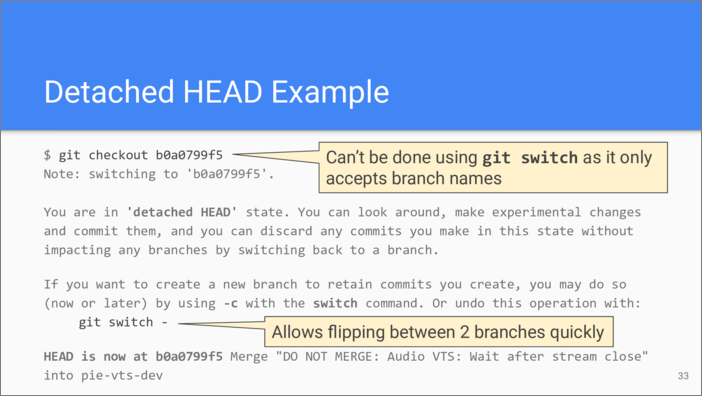
The old multi-purpose git checkout command can be used for changing
HEAD, too. Unlike git switch which only accept branch names, git
checkout can switch HEAD to any commit.
However, if the commit is not referenced by any branch, switching to it
creates a so called “detached” HEAD. This isn’t a normal state for
development as git commit will not be able to refer the new commit
from any branch. That means, the new commit will be considered “garbage”
by Git and removed from the repository sooner or later.
That’s why Git displays this lengthy message when you switch to a
detached HEAD. BTW, it also hints you about a quick way to flip between
the last two branches by passing minus (-) argument to git
switch. The takeaway is—if you see this message, don’t commit any
changes unless you really know what you are doing.

As Git was created for distributed development, it natively supports synchronization with remote repositories. “Remote” doesn’t necessarily means that data is on another machine, it can reside in a different folder on the same hard drive.
To add a remote, use git remote add
command. As you can guess, Git sets no artificial restrictions on
how many remote repositories you may have.
Let’s do a brief recap on the main commands dealing with remote
repositories. git clone allows
starting a new local repository from a remote one. It’s a shorthand for
creating an empty repository, adding a remote and syncing from it. There
are actually two commands for syncing: git
fetch and git
pull, we will consider the
differences between them later. git
push is used to sync your local
changes back to the remote.

You never manipulate the contents of remote repositories directly. When you sync from a remote repository, all its objects and references get imported into your local repository, thus it effectively becomes a cache for remote data. After you’ve made any changes which means you have created new objects and changed references, these changes can be synced back to the remote using the same synchronization process.
As Git was designed as a peer-to-peer system, it doesn’t matter which side initiates data transfer. The remote side can request data from you, or you can push your local data to remote side. In the latter case you must have the necessary permissions.
Now let’s talk about the difference between git fetch and git
pull. The former doesn’t change the state of your branches or the
working tree, it just does the synchronization. git pull by default
is a shorthand for doing git fetch and then executing git
merge. UPDATE: You can pass
--rebase argument to do a rebase instead.
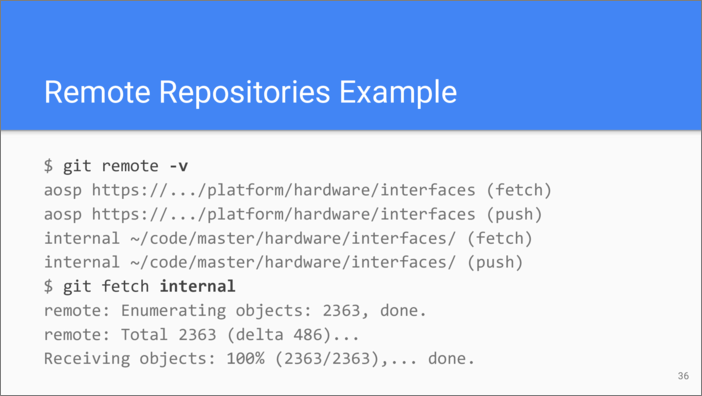
Here is an example of using git remote command. First, we list the
remotes by passing the -v argument. There are two remotes here, one
called “aosp” which is accessed via HTTPS, and another called “internal”
which lives on the same machine. It’s possible to use different URLs for
fetching and pushing.
Then we execute git fetch command to receive any new objects and
references from the remote called “internal”. After it has finished you
can access the contents of objects received from the remote.
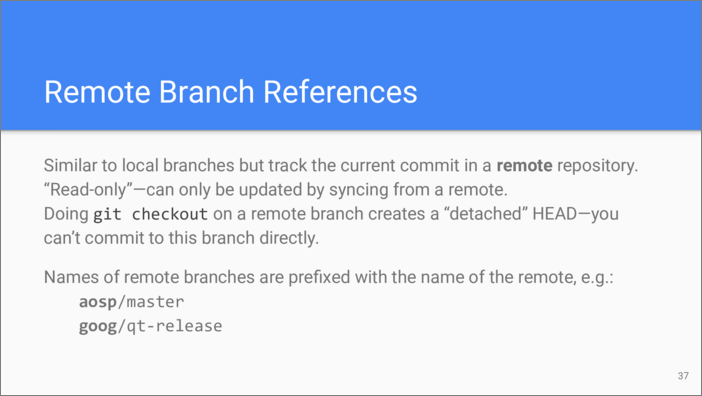
As we know, branches are the entry points to repository objects.
Obviously, it’s a good idea to use branches of the remote repository to
access its commits. From the building blocks point of view they don’t
represent anything new—they are also files pointing to commits. However,
because conceptually they are in remote repository, they can’t be
updated in any other way than syncing from a remote. For the same
reason, if you attempt to do a git checkout using a remote branch
name, this will result in a detached HEAD.
The name of a remote branch reference is the same as the name of the branch in the corresponding remote repository. For namespacing purposes, names of remote branch references are prefixed with the name of the remote.

And here is another term from Git vocabulary—a ”tracking” branch. Since remote branch references are read-only, in order to do any development on a branch coming from a remote repository—it is called “upstream” branch—you need to have a local branch. Usually it has the same name as the upstream branch, but that’s not mandatory. The name of the upstream branch is stored in the metadata of the “tracking” branch.
If you attempt to switch to a non-existing branch using the same name as
one of remote branches has, Git will automatically assume that you want
to create a new branch that should track that remote branch. In order to
have control over this behavior, you can use --track argument of the
git switch command.

Here is an example of what happens when you switch to a local tracking
branch after doing git fetch. If there were remote changes on the
upstream branch since the last sync—the last common commit is labelled
“C” on the diagram—Git will offer to merge your local branch with
the remote branch to integrate the changes together. Since these
branches have diverged, a fast forward is not possible, and a merge
commit will need to be created.
If you are not allowed to have merge commits, then instead of doing a merge you should rebase your changes on top of remote changes. We will consider the mechanics of this a bit later.
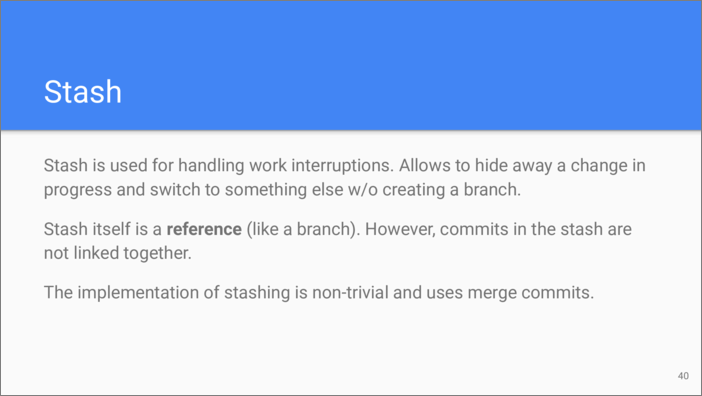
Enough with remotes, let’s talk about the tool that helps handling work interruptions. Sometimes you are in the middle of working on a change and then something unexpected happens: your previous change has caused a build break and a simple fix is needed immediately, or you’ve got some ideas and need to test them quickly on some other branch. You don’t want to lose your current changes, but you also don’t want to commit them as is.
One possible way of handling this is to create a branch and commit your
current changes there, then checkout another branch to restore the
working tree contents to a known state. However, there is another more
convenient solution—to stash the change away using git
stash command. This command saves
your current index and working tree modifications into the repository as
commits and brings the working tree and index into the previous
committed state.
In terms of building blocks, Stash is just another reference, like a branch. However, the last stashed commit does not use the hash of the previously stashed commit as a parent. It’s actually interesting to understand how stashing is implemented.
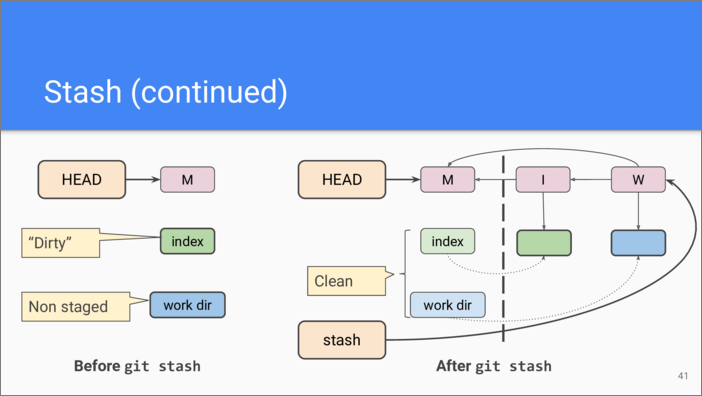
Let’s say we have the last commit called “M”. We have made some changes
and added them to the staging area, then we have also made some changes
to the working tree and haven’t yet staged them. Now we execute git
stash, what happens?
First, Git creates a commit from the contents of the index, setting “M”
as a parent—as if we have executed git commit command. This commit
is shown as “I” on the diagram. Git also snapshots working tree contents
and creates another commit for them, called “W” on the diagram. This
commit has two parents: “M” and “I”, so this is a merge commit. The
stash reference is then set to point to that commit. After that, Git
resets the index and the working tree to the state of the commit “M”.
This brings up a question: if we do git stash multiple times, how
can we find previously stashed commits?
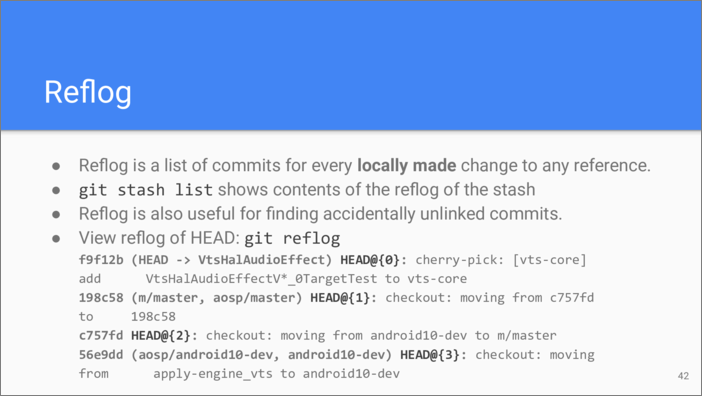
To answer the question, we introduce another powerful tool of Git—the Reflog. Speaking in terms of building blocks, this is just a list of commit hashes. The power comes from the fact that Git adds a node to this list every time any local reference changes. This includes HEAD, branch references, and Stash.
So, answering the question we have previously stated—in order to find
previously stashed commits we can look into the reflog of Stash. git
stash list command does exactly that.
Another useful application for reflog is finding commits that you have
accidentally unlinked from branches. You can find their hashes either in
the scroll buffer of your terminal—if they are still there— or in the
reflog.
Here is an example of executing git
reflog command. It lists the
history of changes to HEAD. The reference specifications in the reflog
commits list use special syntax which we will consider later.