Mikhail Naganov
Modular Audio Processing System, Part I
Recently I have completed assembling a system which I use for my casual audio playback needs and for audio experiments. I decided to reflect on the process of choosing and tuning the components of the system, also mentioning other options I was considering.
The goal of the system is to accept audio from various sources: files, mobile devices, web browsers, then process it to apply necessary room/speaker correction and binaural rendering, and then play on speakers and on headphones. There are of course numerous ready made commercial solutions for this, packing everything into one unit, however my intention was to have a truly modular system where each component can be replaced, and new functionality can be added if needed. Essentially, the system is built around a Mac computer with a pro soundcard. The challenging part was to figure out what additional equipment I need, and how to organize it physically, so that it does not just lay as a pile on the table, entangled by a web of cables.
For a long time already I stick to the “half rack” (9.5 inches) equipment form factor. I have a couple of racks and some audio equipment which either was designed for this format, or can be easily adapted to it. Here is how my current rack looks like:
Below is the schematics of connections between the blocks:
As I’ve mentioned before, the heart of the system is a Mac—an old model Mini from 2014, which I’m also using to type this post in. I’ve highlighted the inputs and the outputs of the system. Some of the input and output ports are mounted on the back panel:
All other interconnections are hidden inside the rack, and this makes the result to look nice if not “professional.” Now let’s consider the system component by component.
Mac Mini + MOTU UltraLite AVB
These two components essentially make a single unit equivalent to a dedicated DSP system, but in my opinion, more flexible. I wrote about the capabilities of UltraLite before: here and here. The features that I use for my needs are:
- The routing matrix which is convenient for collecting various inputs: from applications, from external hardware, and via Ethernet. Note that I only use digital inputs on UltraLite in order to avoid adding noise.
- AVB I/O is worth mentioning on its own as, I think, it’s much more flexible than traditional point-to-point digital audio interfaces: SPDIF and USB.
- DSP with some basic EQ functionality, as I wrote in the earlier post on the speaker system setup, it’s enough for some basic corrections, however it is incapable of “serious” linear phase processing, which is done on Mac.
As for the functionality where UltraLite falls short, Reaper DAW running on Mac Mini helps to fill in the gaps. Here I can run linear phase FIR filters, linear phase equalizers, crossfeed and reverberation for headphones, and create arbitrary audio delays for synchronizing audio outputs. Note that although Mac Mini isn’t a fanless computer, it stays perfectly quiet while running all this processing. Only sometimes does it briefly turn on the fan—this sounds like a loud exhale—and then keeps itself silent for awhile.
Having AVB input is nice as it allows using other computers for providing audio. Although Mac Mini runs Reaper alone with no glitches, launching a web browser inevitably introduces them—modern browsers are very heavy CPU-wise and perform a lot of disk I/O. That’s why whenever I have to use a browser-based streaming client, I prefer to run it on a separate computer or a mobile device. The beauty of AVB is that, on Mac at least, one does not need to use any extra hardware audio interfaces, the only thing that is needed is a Thunderbolt to Ethernet dongle.
I also use UltraLite as a DAC—it has 8 line level outputs. Despite that interfaces by MOTU are considerably cheaper than functionally equivalent interfaces from RME, the quality of their analog outputs are on par, if not better. For example, below is a comparison of THD+N measurement for 0 dBFS 1 kHz tone, at +13 dBu of UltraLite’s line out vs the line out of RME FireFace UCX (1st gen), both interfaces running at 48 kHz sampling rate, as measured by E-MU 0404 (this is to eliminate any possible bias when the card is measuring itself via an analog loopback):
Note on the output level—RME has selectable output level for its line outputs with the following modes: -10 dBV, +4 dBu, and Hi Gain (see the tech specs). From measurements, I’ve found the +4 dBu mode to be the “sweet spot”: the signal level is high enough, yet distortions are lower than on Hi Gain. On MOTU Ultralite, the same output level is achieved by setting the output trim to -6 dB (that is, the level of full volume output on UltraLite is equivalent to Hi Gain mode on FireFace).
As we can see from the direct comparison, the output from MOTU is cleaner (this could also seen from comparing tech specs, but I wanted to double-check that, also MOTU specifies THD+N of output as low as -112 dB, I could not confirm that). Note that the 2nd generation of RME FireFace UCX declares better specs, but it’s still much more expensive than MOTU. The huge benefit of the RME interface is its rock solid stability. With MOTU I’m occasionally running into the issue with emerging high-pitched signal dependent noise, fixing which requires rebooting the interface.
Lossless Wireless Output via Audreio
All the connections in my system use wires. However, sometimes it’s nice to be able to drop the headphone wire, especially when I’m listening to music while doing things away from the computer. Surely, I did try a Bluetooth option, using a transmitter based on a Qualcomm chipset, which supports aptX HD codec—still lossy but sounding good nevertheless. However, it seems that BT transmitters, despite what their marketing materials say about the range of the connection, are mostly designed for the case when the listener sits in front of a TV. Once there is no straight line of sight between the TX and the RX, or when I move a bit further away, the connection switches to a lower bitrate, and finally degrades to the SBC codec which sounds noticeably lossy.
Because of this limitation of Bluetooth I decided to use WiFi. Its stations have more powerful transmitters and can turn up the power, even beaming the radio waves towards particular direction—do everything in order to keep a high bitrate connection with the receiver. I use my phone as an endpoint and run Audreio plugin inside Reaper on Mac to transmit audio to their app running in the phone. Since I’m not interested in low latency, I set the largest buffer size, and this works well with almost no dropouts as I’m moving around my house. Unfortunately, further development of Audreio has been canceled, however the last released app and plugin versions are stable and I haven’t run into any issues while using them.
Naturally, with lossless audio delivered to the phone, it would be unwise to use wireless headphones. Instead, I usually use ER4SR by Etymotic, powered by a simple headphone DAC dongle by UGreen company, we will check its performance later.
Drop + THX AAA 789 Headphone Amp
I picked this amp because it has balanced line inputs and variable gain setting. I prefer balanced line inputs because there can be strong electro-magnetic fields inside the rack due to presence of power supplies. The Drop amplifier it is indeed very linear, thanks to the THX schematics.
Other options that I tried:
- Built-in output on MOTU UltraLite. This one I only use for “debugging” or quick A/B comparisons. MOTU’s output has relatively high output impedance, not as linear as Drop, and the volume control is not very comfortable.
- Phonitor Mini. I used these for a long time and they were my reference for the crossfeed implementation. They also have balanced inputs and a dedicated mute switch, so you can leave the volume setting intact when you need a brief pause. However, both units that I had suddenly broke at some moment.
- AMB M3 (my build). Due to its high power, this amplifier is also very linear under normal listening conditions, however it has two shortcomings: lack of balanced inputs, and high level of cross-talk between channels (not to be confused with crossfeed) due to it’s “active ground” design. More about this in my old post.
I don’t consider a headphone amplifier as the tool to make listening more “enjoyable.” In my setup all psychoacoustic improvements are achieved by DSP processing. Thus, what is left to the headphone amp is to be as “transparent” as possible, and that means:
- linearity and low noise,
- close to zero output impedance, and
- consistent left-right balance across the volume range.
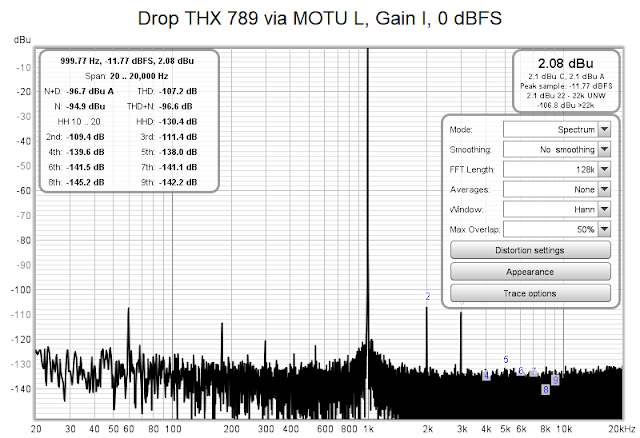
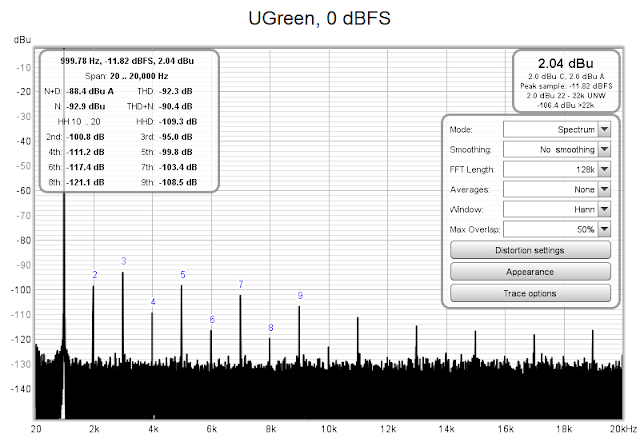
It’s interesting to compare output from Drop’s amplifier with the mobile DAC by UGreen into the same resistive 33 Ohm load. Drop is driven by the line out of MOTU. UGreen dongle is connected to an iPhone running Audreio app. The signal source is the same—REW. Volumes are set to provide the same output voltage of about 2 dBu: for UGreen this is maximum volume, Drop still has some room for increasing the volume, and the gain setting is I (minimal gain):
Unfortunately, there has been some mains noise during measurement which has degraded the calculated THD+N value. However, the THD figure is the same as we have seen on the MOTU’s line out directly, this is very good.
It’s clear that the dongle is struggling at this output level. Better THD (less harmonics) are seen when the output volume is reduced to about 3/4, however this lowers the signal-to-noise ratio. Still, I think for a $15 dongle the results are good. I was also impressed that the output impedance of the dongle is only 0.3 Ohms. I’m glad that the manufacturer follows good engineering practices.
RDL RU-RCA6A Multichannel Volume Control
With excellent hybrid analog-digital volume controls that modern audio interfaces offer, one could wonder is there still a need to use an external analog volume control. Well, sometimes there is. In my topology, only part of the outputs from UltraLite go to speakers, and there are more than two outputs that need to be controlled simultaneously. Surprisingly, doing this in a convenient manner is still a challenge! Usually volume controls in sound cards only work for stereo pairs of channels or for each individual channel. Even MOTU’s excellent web interface these it no possibility to “bind” several channels into a group for volume control purposes.
That’s why I decided to use an external volume control unit. Another valid use case to use it is when there is a need to build a multichannel output out of multiple stereo DAC units. “Multichannel” does not necessarily mean surround sound, it might be a stereo setup with line level “active” crossovers for the purpose of bi- or tri-amping.
Side note: these days there are plenty of “multi-room” playback systems offering time and volume level synchronization while playing over computer wireless or wired networks. It’s an interesting option to explore, but keep in mind that most of those consumer network protocols, like AirPlay, are limited to CD audio quality (44 kHz / 16 bits). I will talk about AirPlay in the next part of this post.
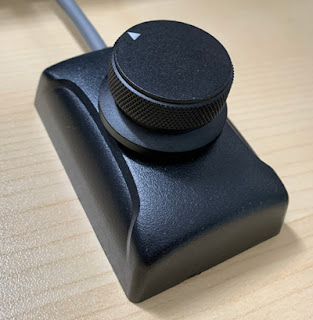
My specific requirement to the unit was the form factor. It’s easy to find a multichannel AV “prepro”, like the Marantz unit I wrote about some time ago, however they are all made in the standard 19” “full rack width” format. Luckily, there exist “pro” equipment, but unfortunately it’s typically quite expensive. Two “mid-price” pieces of equipment that I could find are: RCA6A by Radio Design Labs (RDL) and Volume8 by Sound Performance Lab (SPL—same company that makes Phonitors). I plan to do an in-depth comparison of these units some time later. For now, I can tell that Volume8 is all about the quality of the audio, while RCA6A was built with a focus on providing remote control options. The option which I chose to use with RCA6A is a simple 10 kOhm pot which I put in an enclosure:
Matte finish of the big black aluminum knob I found on Amazon pairs nicely with the plastic of the box.
What about the quality of RCA6A? Yes, for a purist in me, it could be better. Below is the output from the RCA6A at unity gain fed by UltraLite’s line output at the same output volume setting I was using to make the THD+N measurement:
As we can see, RCA6A adds some non-negligible odd harmonics. Note that the level of the 2nd harmonic which originates from UltraLite remains the same, while the 3rd harmonic gets almost 13 dB higher. The level of noise goes up by 3 dB. However, because I still use inexpensive KRK Rokit monitors, I doubt that RCA6A is a “bottleneck” in terms of audio quality.
To be continued
As shown on the photo of the rack and the scheme, there are also a couple of digital audio units and the power supply. I will discuss them in the next post.


